Wednesday, October 14, 2020

Cybersecurity Housekeeping Checks - As Easy As 1-2-3

 1. Working remotely and keeping the digital world secure requires all AAPS staff to be proactive and diligent. With October heralded as Cybersecurity Awareness Month, now is a great time to be thinking about reviewing the online safety basics. One way cybercriminals have become quite savvy in their attempts to lure people in and get you to click on a link or open an attachment is through a technique called Phishing.


AAPS Phishing

We are seeing a multitude of phishing attempts here at AAPS.  The latest are emails that look like they are from building principals.  They use the username of the principal but it is from the wrong domain, username.a2schools@gmail.com. All AAPS emails will come from either @aaps.k12.mi.us or @a2schools.org not @gmail.com. The emails usually start innocently enough asking something simple like "Are you available?" But they eventually ask for money or iTunes gift cards if you respond. 


How to Avoid Phishing Attacks

When you get an email that looks suspicious, here are a few things to check for:

  • If the sender is asking for something.  Verify through another form of communication that the email is real.  

  • Check that the email address and the sender name match.

  • Check if the email is authenticated.

  • Hover over any links before you click on them. If the URL of the link doesn't match the description of the link, it might be leading you to a phishing site.

  • Check the message headers to make sure the "from" header isn't showing an incorrect name.

  • Don’t click any links or provide personal information until you've confirmed the email is real.

  • Report the email to ITD & Google:

    • Open the message in a browser.

    • Next to Reply , click the 3 dots for More.

    • Click Report phishing.


2. We are starting to see more stability with our Zoom video conferencing tool. If you are using Zoom with your students, please make sure to follow the AAPS Zoom Security Best Practices & Instructions which will help you create the following:

    1. Zoom Personal Security Settings - Steps 1-5

    2. Scheduling a Secure Zoom Meeting - Steps 6-14

    3. Adding a Zoom Meeting Link to Schoology - Steps 15-20


3. Device updates are important to perform regularly!

  • Web browsers - Should be updated to the latest version available.  As of this email here are the current versions:

    1. Chrome - 86.0.42

    2. Firefox - 81.0.2

    3. Safari - 14.0

  • Zoom - Zoom recently released an update with a lot of security updates.  If you have not updated Zoom please check your version.  The current version is 5.3.2. 

  • Teacher Laptop - The current OS the ITD is supporting is High Sierra on the teacher laptops.  Please install any update that Apple recommends that is not an OS upgrade.  

  • Secondary Teacher Devices - Please keep any other devices that ITD may have given you to the latest version.  iPads can be updated to 13.7 and Chromebooks to 86.0.42. 


Thanks for being #cyberaware and #staysafeonline!

Wednesday, April 22, 2020

Google Meet for Video Conferencing


COVID-19 has certainly thrown us all a curve ball when it comes to keeping in touch with each other. For teachers being able to have valuable face to face time with their students, Google Meet is the best option.

Why is Google Meet the best option for AAPS teachers and students?

  • The Google Apps for Education already complies with legislation (CIPA, COPPA, FERPA, HIPAA) to keep students and their data safe while in a virtual environment.
  • The AAPS Google suite of applications offers tools that work hand in hand to create a more fluid environment when navigating between multiple interfaces.


Best Practices for Google Meet

  • Look at this Video Conferencing Do’s sheet for instructions and tips
  • Create a Meet session using a Nickname. Watch this video about Google Meet with a Nickname. A Meet session with a nickname offers the safest option. It allows the session to only be active when the teacher has entered the session.
    • Students can’t enter prior to the teacher entering the session
    • Students can’t come back to the session after the teacher has left. The teacher must be the last person to leave the Nicknamed session.

Extensions to make Google Meet more Zoom-like

Many staff members like Zoom. However it doesn't meet requirements mandated by legislation to keep students safe. (CIPA, COPPA, FERPA, HIPAA) To transform your Meet session to be more like Zoom download the following approved Chrome extensions.


Google Meet Grid View - to see all participants are one time
Nod - Reactions for Google Meet - allows students to raise their hands and give a thumbs up.
Meet Attendance - helps to capture all attendees, great for PD trainings
Google Meet Push to Talk - Uses the spacebar to unmute to talk


Image credit:  @michGoogle Apr 20, 2020

By: James Marcum

Wednesday, December 4, 2019

MediaCast is Back

image.png

We are pleased to announce that MediaCast is back up and running!   After a major hardware failure, most of the data has been recovered and is back in place and ready to access!

There are a few files that were not fully recovered, so you may find an occasional resource that you want to use is not playing correctly.  You can report that title to us at helprequest@aaps.k12.mi.us and we will work on recreating that resource.

MediaCast is accessed through any browser using an AAPS Active Directory login.  The address is mediacast.aaps.k12.mi.us

Titles that were purchased by AAPS libraries are also linked in the Destiny catalog.  Simply click the direct link in the Destiny record.

Clearing your Cache:

It may be a good idea to clear your browser cache before you access MediaCast to make sure you are getting the most current information from the site. Here are instructions on how to do this for all 3 browsers on a Mac:

Safari:

  • Go to Safari > Preferences
  • Click Privacy
  • Select Manage Website Data
  • Click Remove All
  • Confirm by clicking Remove Now


Chrome:

  • Click the Google Chrome settings icon in the top right browser window
  • Choose Settings
  • Select Advanced at the bottom
  • Under Privacy and Security click Clear browsing data
  • On the Basic tab make sure all 3 boxes are checked and range is set to All Time
  • Click Clear data button to finish


Firefox:

  • Navigate to History > Clear Recent History from the Firefox menu bar
  • Select Everything from the time range menu
  • Make sure all the items under History are select
  • Click Clear Now


Tuesday, November 19, 2019

Using Printer Presets to Save Time


When you print from your Macintosh computer, you have options to set printer options and then save them to a preset that allows you to choose the same options quickly.
These directions show the process starting with Microsoft Word, but once the presets are built, they work from any application.

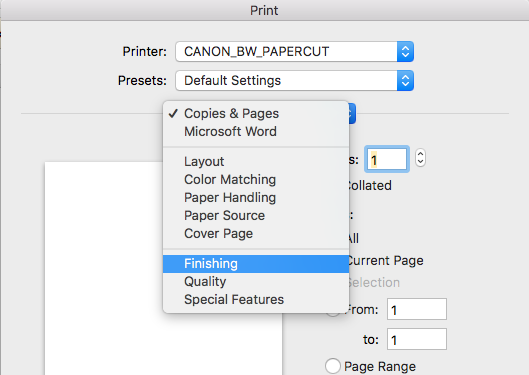
Open any Microsoft Word document and start to print to your printer. In this example, we are using the CANON_BW_PAPERCUT.

Click on the options bar--that line in the middle that says “Copies and Pages” to access your options… in this case, Finishing.


Choose the settings you want to save--2-sided and/or stapling:


Look at the top for the “Presets”, and select “Save Current Settings as Presets


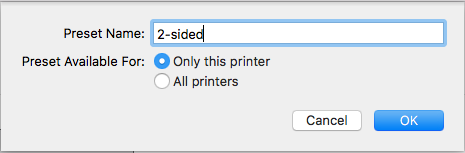
Give your shortcut a descriptive name.  Leave it set for “Only this printer”


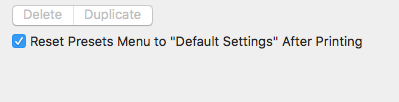
★ First time only – go back up to Presets and choose Show Presets...


Check the box for Reset Presets Menu to “Default Settings” After Printing

You can skip this step if you are sure that you always want to use this preset.

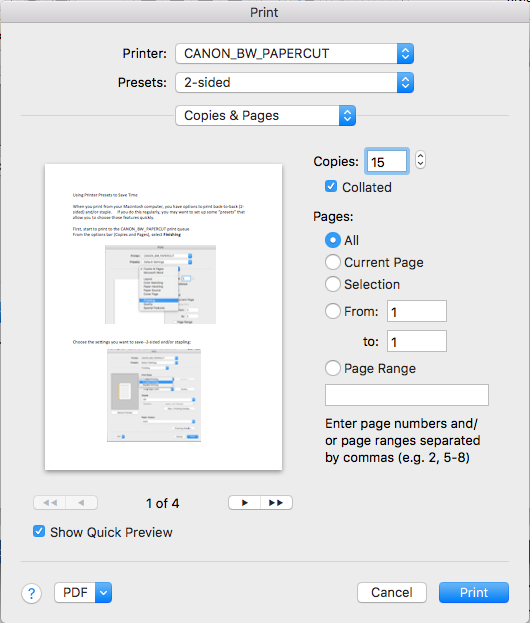
To print using presets,

- first choose your printer queue,
- then choose a preset if needed,
- then change the number of copies
- or make any other adjustments…
- then click Print.


Wednesday, May 22, 2019

New Tech Tools to End the Year With

I know this time of the year is crazy busy but hopefully not be too busy to try and learn new things.  Here are a few new tools you should try before the end of the year. The first four were taken from a nice tech blog I follow: Cult of Pedagogy.

GOOGLE TOUR CREATOR

If you are familiar with Google Expeditions, Tour Creator is a tool you should look into.  This tool helps you create your own VR tours. Google cardboards are a very affordable way to use VR in the classroom once you have created a tour.  


GEOGUESSR

A very fun geography game that uses Google Street View to drop you somewhere in the world.  The challenge is to figure out where you are. You can drive down the road to check out the scenery and signs but can not zoom out.  Once you think you know where you are drop a pin on a world map and it gives you a score.


WEBJETS

Webjets is a great tool for group projects.  It is an easy way to get all ideas and digital materials all in one place no matter what they are.  This is very much like Padlet but free for educators.

PROWRITINGAID

A very nice writing tool that has a free version that if you are an english teacher you should check out.  To be honest I should probably start using this on these emails I send out :)


Open Education Resources
Open Education Resources (OER) are materials for teaching and learning that are either in the public domain or have been released under a license that allows them to be freely used, changed and shared with others. Checkout the #GoOpenMichigan Initiative.

Tynker Jr.
If you teacher early elementary (ages 4-7) and would like to integrate more coding into your class Tynker Jr is free until August.  Let me know and we can push the app out to any school iPad.

Wednesday, April 17, 2019

Introducing 2-Step Verification

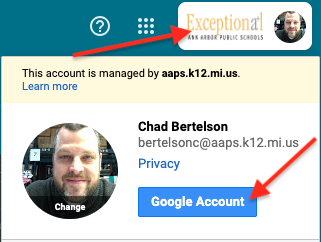
Starting today, ITD has activated the ability to turn on 2-step verification to your AAPS gmail account.  2-Step verification will protect your email account from someone else signing in as you from a different location. All you need to do is associate a cell phone number with your account and when you sign in, it will send you a code.  You probably already have this set up with other internet accounts such as banking or credit card sites. Google only runs the verification once a month when you are using the same device. If you log into Google from a new computer or device it will activate the 2-step verification. Once you set it up, you will forget you even have it activated.   This is not required but is highly encouraged.  If you are interested, here are instructions on how to set it up.  It only takes a minute or two to set up:


1. Open your Google Account here or with your Gmail open, click on your profile in the upper right head corner and select Google Account. You may need to sign in.

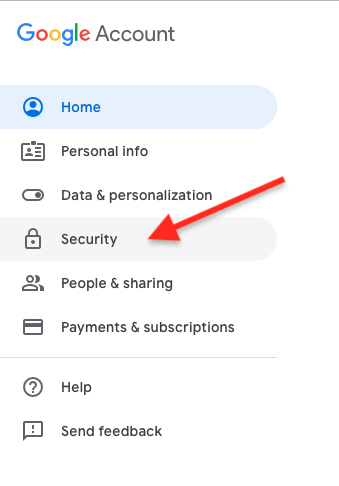
2. Click Security on the left hand side
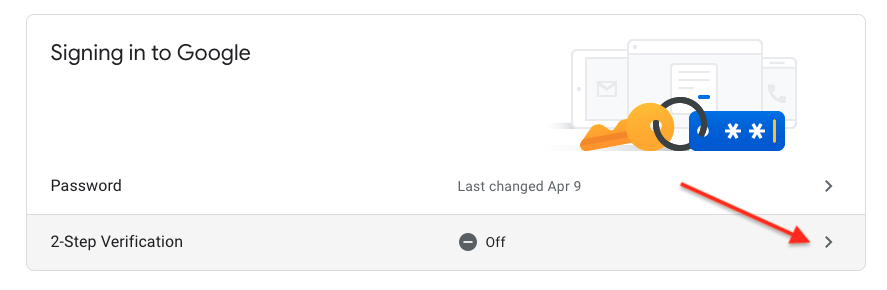
3. Under Signing into Google select 2-Step Verification and click the > arrow.
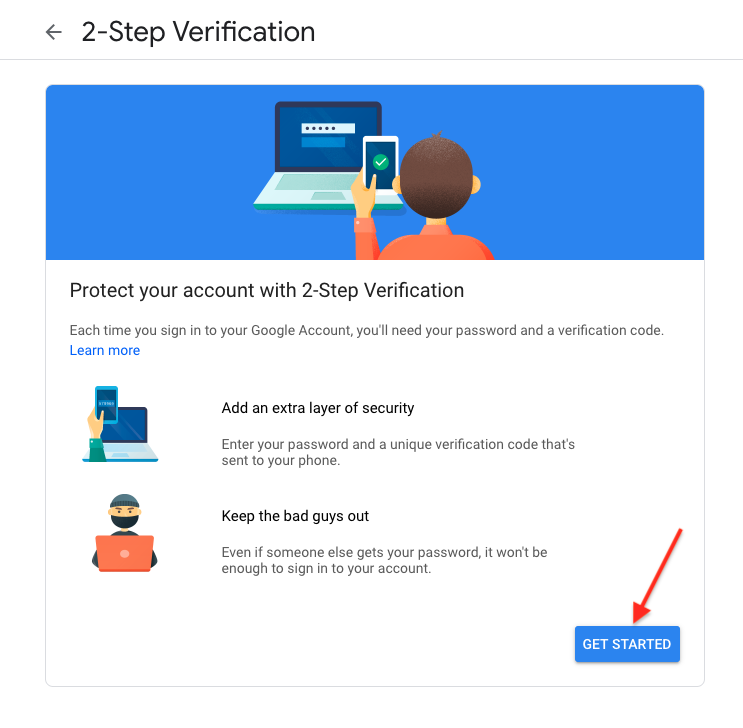
4. Click Get Started


5. It will most likely ask you to sign into Google again.

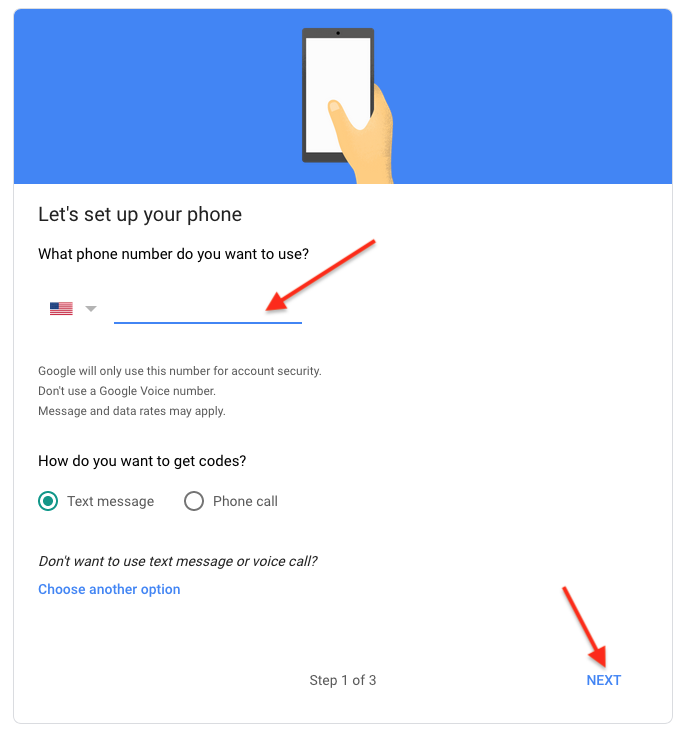
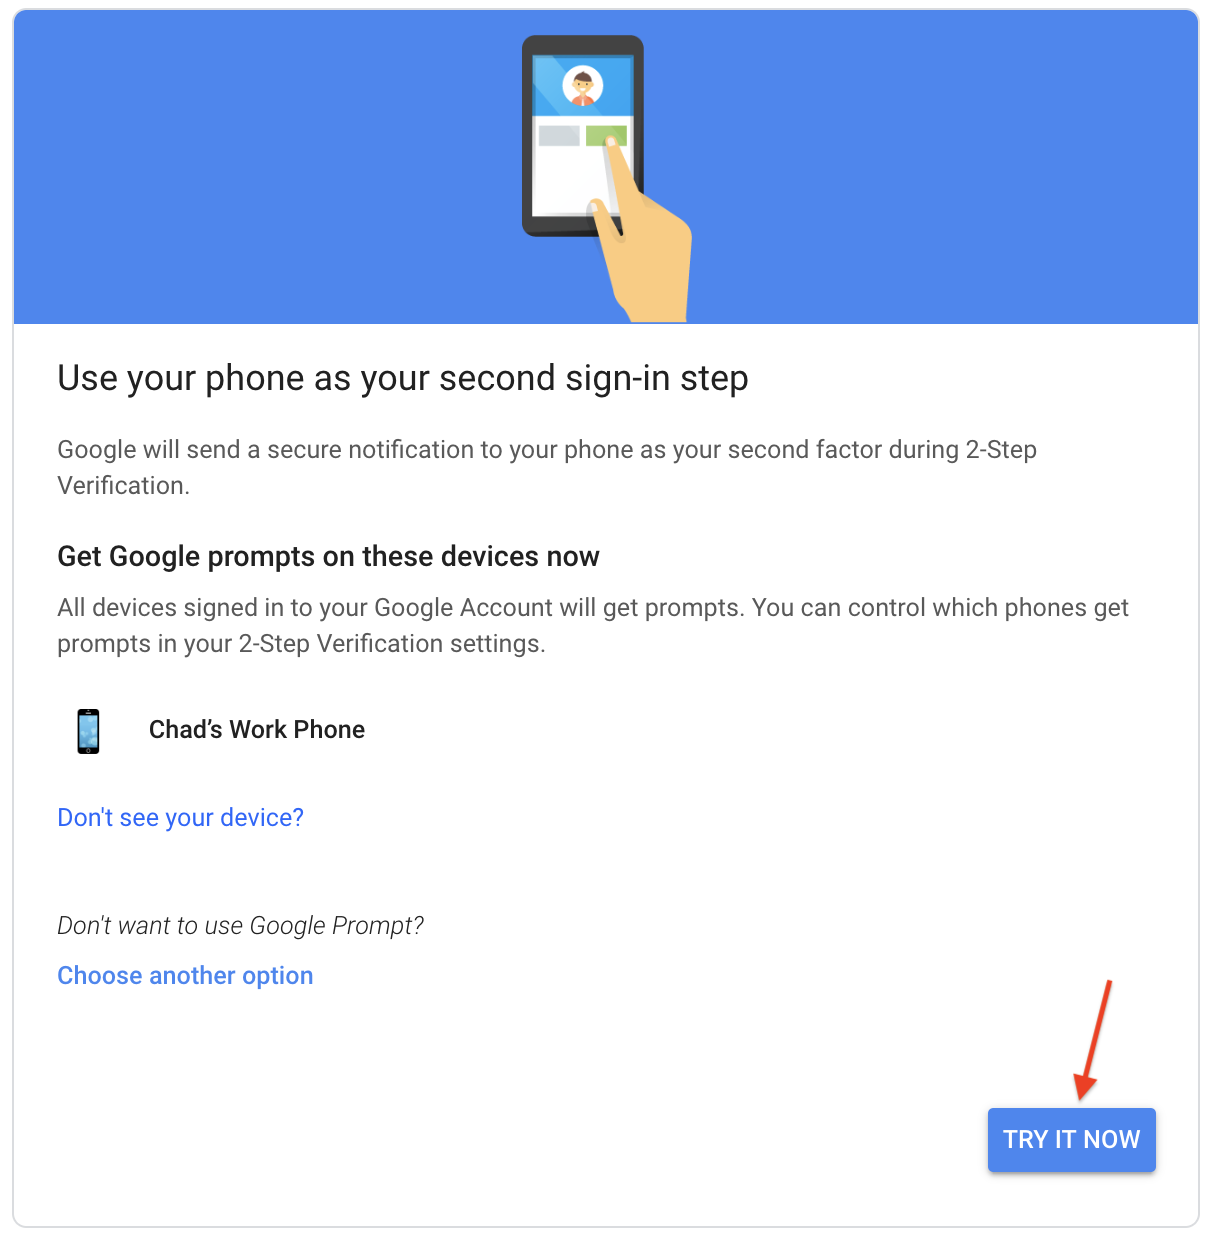
6. If you have never associated a cell phone number with your Google account enter your cell phone number and select Next. If you already have a phone associated with your account click the Try It Now button. This will either send you a verification code or link on your phone.

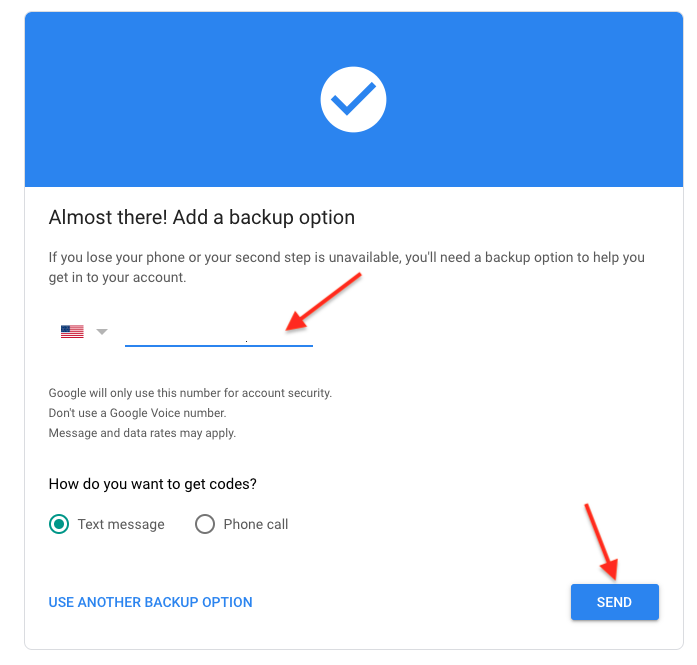
7. After completing that step you should see this screen. It gives you the option to enter an addition phone number as a backup. Click Send. This will send you another verification code. Enter the code on the next screen and hit Next.

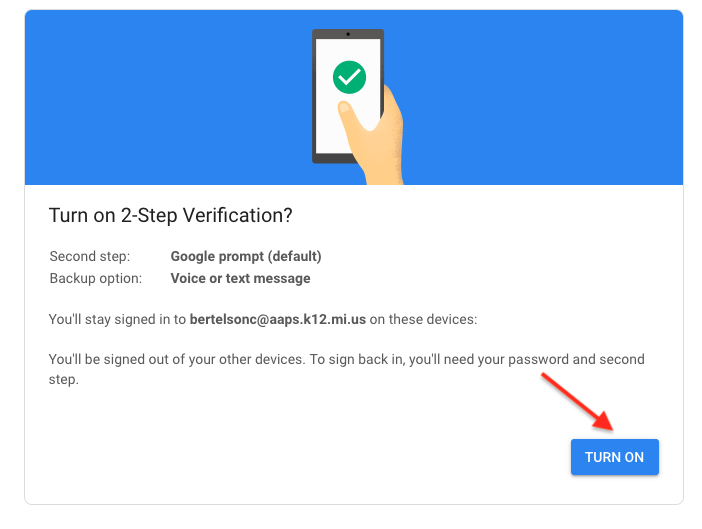
8. Click Turn On

Thursday, April 11, 2019

Spring Cleaning Time


With spring upon us, it's a good idea to do some spring cleaning and spruce up your computer.  Here are some helpful tips:

Clear Cache:
Browsers are constantly downloading content onto your computer.  They do a pretty good job at managing this content but need a little help now and again to keep things running well. Here is a blog post about clearing your browser cache:


Clean out Download Folder:
One folder on your computer that tends to accumulate a lot of junk is the download folder.  This is the default location for your computer to save downloaded things from the internet. From your desktop, click “Go” from the top menu bar and select download.  I would recommend moving anything you would like to keep to the documents folder and move the rest to the trash. Don’t forget to empty your trash when you are done.

Restart More:
When was the last time you restarted your computer?  If you can’t answer that question, you definitely don’t restart enough.  A good rule of thumb is to at least shut your computer down once a week. When you leave school on Friday, shut your computer and don’t turn it back on until you need it again.  You need a break over the weekend and so does your computer.

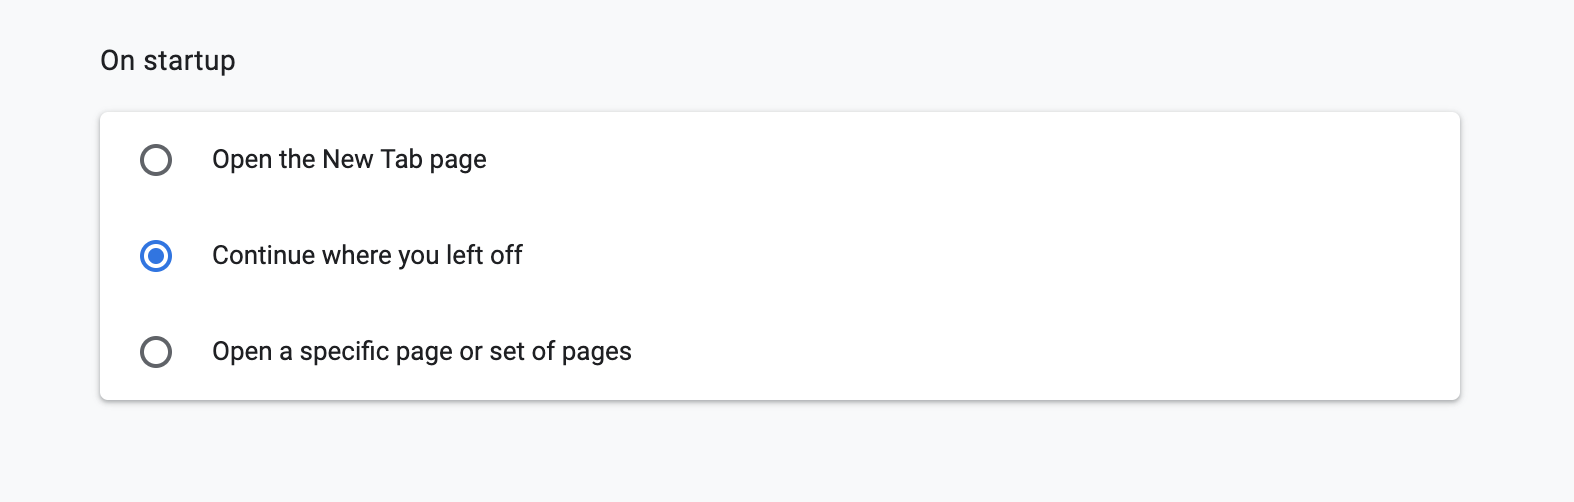
One of the biggest reasons we hear from users for not restarting is they don’t want to lose their chrome tabs.  There is way to work around this. Go to three dots in the upper right hand corner of chrome and select settings.  From there, scroll down to “On startup” and change the setting to “Continue where you left off.”  When you quit chrome now, it will reopen all your tabs the next time you open it.


Change your Google password:
It’s always a good idea to change your password if you have not done it in a while.  Check out this blog post:


What updates to run?
ITD is still not ready for the Mojave update.  When we are ready, we will send out instructions.  Until then, here is what we recommend updating:

Wednesday, March 20, 2019

Top 10 Device Safety Tips (ok only 8, you're busy)

Top Four Tips for Student Laptops/iPads:

  1. Your hold is important!  There are two ways to hold it:  two hands like a lunch tray or hold it like your long, lost best friend.  Important things need love. These devices are important to the work that we do in the classroom.  Please help your kiddos remember this.
  2. The floor is not your friend!  It feels natural to many students (and teachers) to sit on the floor and work. This often leads to students placing the devices on the floor and incidentally using them as leverage to get up, which results in cracked screens.  A hard, elevated surface is best!
  3. Unhook those headphones!  Do not move around room with headphones plugged in.  Repeated experiences with headphones still plugged in could result in headphones broken off in devices.  Unplug before you go!
  4. No liquids on tables where devices are used.  Spills and technology do not mix. See teacher computers for more details.

Top Four Tips for Teacher Laptops:

  1. That 15 minute lock that drives you crazy?  It is there to ensure that the amazing student data that is behind that computer is safe, secure, and away from public use.  
  2. Wrap power cords!  Not only are they more organized in your cute teacher bag, but it increases the longevity of the cord.   
  3. Computers do not like hot or cold! Do not store them in locations that will make them shiver or sweat.  
  4. They also are not fans of liquid!  We need to stay hydrated. Teacher laptops (and student devices) do not.  This is the highest cause of accidental damage. Keep the water bottles away!

Wednesday, February 27, 2019

AAPS Wireless Networks

ITD is making a push to remove old legacy systems still in place. The wireless network AAPSWF is going away and will be turned off during spring break. We have been working toward this goal for a while now and most things should already be moved to the proper wireless network, but please verify that you are no longer connected to AAPSWF. Please do this on all devices that may be in your room as well.

How do I check my wireless network?

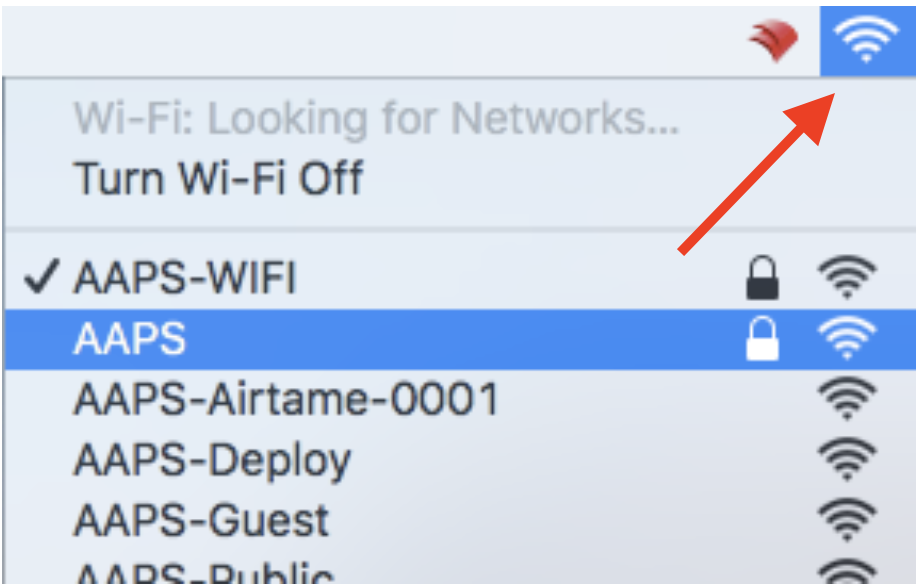
It is very easy to check which wireless network you are connected to. Simply click on the wifi symbol on the menu bar (upper right hand corner by the time). The network with the check mark is the one you are connected to.


What network should I be on?

There are few different options for wifi when you are at school. Here are the differences in the networks:


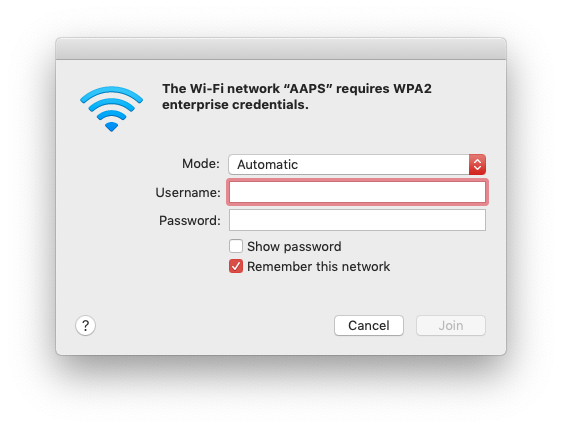
AAPS – This wireless should used by staff on district-owned devices. Log into this network with your Active Directory account. If you have a new teacher laptop, you should be connected to this network already.


AAPS-WIFI - Used for district-owned devices only. This is the replacement for the AAPSWF network. This network does not get used with personal devices.


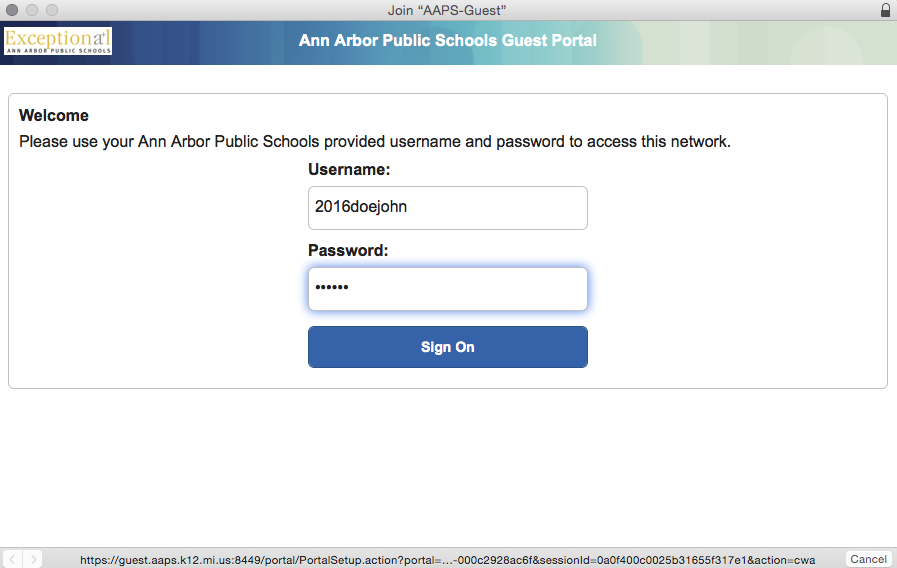
AAPS-Guest - Students or staff using “Bring Your Own Technology” (BYOT) in class need to enter their Active Directory Login/Password and accept the Use Agreement to access this network
Macintosh HD:Users:hotaling:Desktop:Screen Shot 2015-09-11 at 2.11.09 PM.png


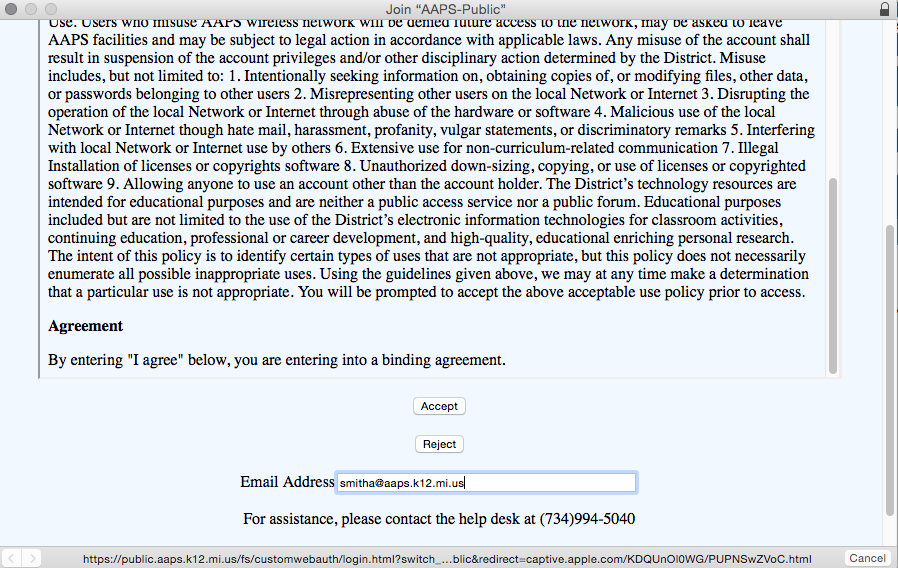
AAPS-Public - For visitors, parents and community members.
  • Users must provide their email address and accept the Use Agreement to access this network. The setup is similar to the screens you see when visiting a network at a hotel or coffee shop.
  • The email does not have to be an aaps.k12.mi.us email address.
Macintosh HD:Users:hotaling:Desktop:Screen Shot 2015-09-11 at 2.12.11 PM.png


These networks will require students to re-authenticate to the network after a period of two hours.

What do I do if I’m connected to AAPSWF?

Please select a different network based on the definitions above. In general, if the device is a school-owned teacher laptop, you should connect to the AAPS network. If it’s a school owned student device or desktop that needs to be on wifi, it should be connected to AAPS-WIFI. If you can not get connected to the proper network, please put in a help ticket.


Wednesday, February 20, 2019

School Messenger

School messenger is a simple way for teachers to communicate with students and parents that is integrated into PowerTeacher.  Below are simple instructions on how to use Messenger and send a test message.  If you would like more detailed instructions please see the link below.  


 Sending Your First Broadcast 

Step 0: Open Message Sender 
1. Log in to PowerTeacher 
2. Click on Message Sender on the left hand menu 

image.png
Step 1: Subject & Recipients 
1. Enter a Subject (e.g. My First Broadcast) 
2. Select a Type (Default is Teacher Messaging) 
3. Click Add Me and check your contact details 
4. Click the green Continue button in the lower right when you are sure your contact details are correct 


Step 2: Message Content 
1. Verify “From” details 
     a. From Name 
     b. From Email 
     c. Reply to Email (Can be different than “From Email”) 
     d. Subject 
2. Compose Body of Email 
3. Click the green Save button in the lower right 

image.png

Step 3: Review & Send 
Your Broadcast should contain 1 recipient. Click Send Now on the lower right to get your Test Broadcast underway. 

Check your Email 
Now check your email. You should see the message you just sent! 

Review your Broadcast Report 
Finally, you should have also received an email report summarizing your Broadcast. After each Broadcast, an email is sent with a report displaying the delivery results. 

Detailed Instructions 


Thank you Lena Hand for creating this how-to!